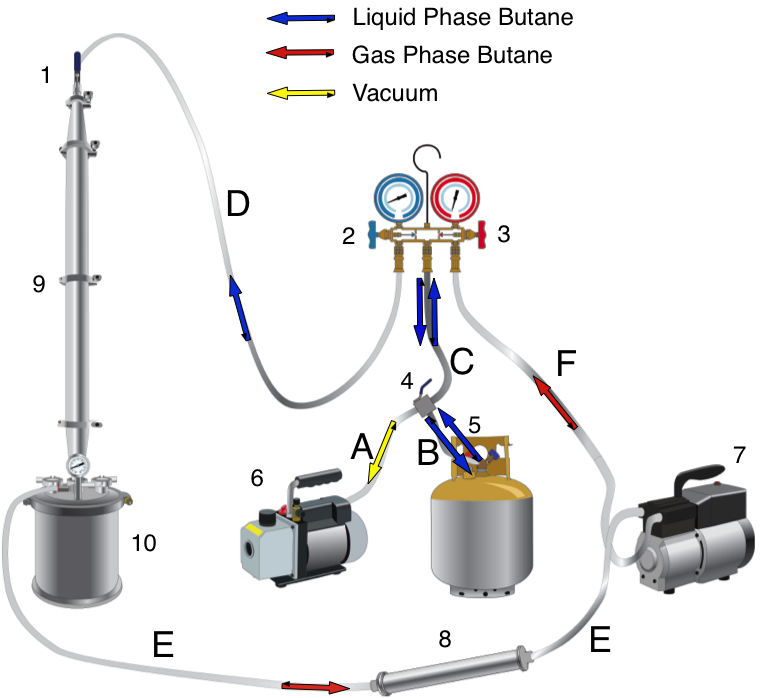
There are two reasons to vacuum the extractor: 1. create negative pressure to “pull” the butane into the extractor; 2. remove oxygen from the extractor to prevent potential explosive conditions. Follow the steps below. One step at a time, you vacuum out each segment of the extractor. The chart will show you the open/closed condition of every valve or on/off switch as you work through the steps. Final image - vacuum diagram

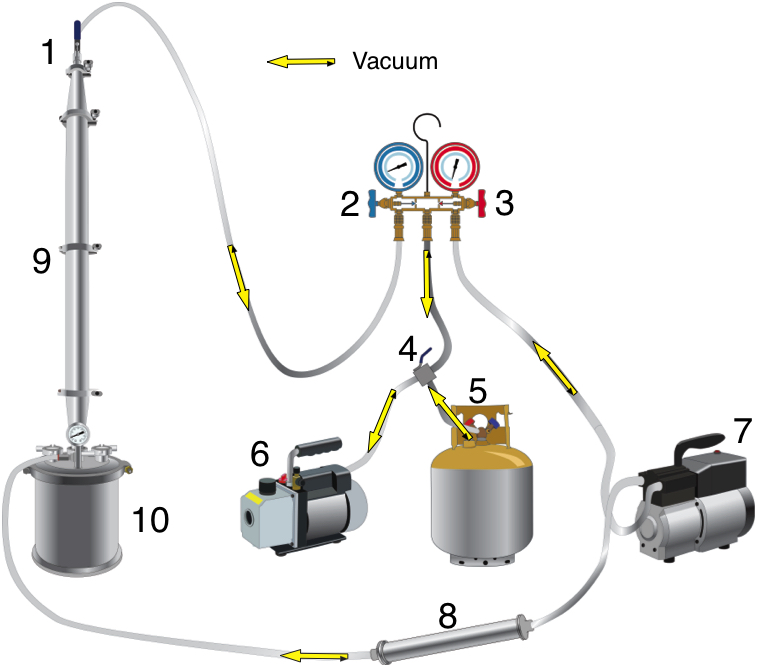
Step 1 – Pre-vacuum – turn on vacuum
Component #Component NameAbbreviationOpen/OnClosed/Off
1Extraction Column ValveECVx
2Low Pressure Recovery ManifoldRM2x
3High Pressure Recovery ManifoldRM3x
4Purge PortPPx
5Recovery CylinderRCx
6Vacuum PumpVPx
7Recovery PumpRPx
Step 1.1 – Vacuum – open purge port (4)
Component #Component NameAbbreviationOpen/OnClosed/Off
1Extraction Column ValveECVx
2Low Pressure Recovery ManifoldRM2x
3High Pressure Recovery ManifoldRM3x
4Purge PortPPx
5Recovery CylinderRCx
6Vacuum PumpVPx
7Recovery PumpRPx
Step 1.2 – Vacuum – close purge port (4) and open high pressure recovery manifold valve (3)
Component #Component NameAbbreviationOpen/OnClosed/Off
1Extraction Column ValveECVx
2Low Pressure Recovery ManifoldRM2x
3High Pressure Recovery ManifoldRM3x
4Purge PortPPx
5Recovery CylinderRCx
6Vacuum PumpVPx
7Recovery PumpRPx
Step 1.3 – Vacuum – close high pressure recovery manifold valve (3) and open low pressure recovery manifold valve (2)
Component #Component NameAbbreviationOpen/OnClosed/Off
1Extraction Column ValveECVx
2Low Pressure Recovery ManifoldRM2x
3High Pressure Recovery ManifoldRM3x
4Purge PortPPx
5Recovery CylinderRCx
6Vacuum PumpVPx
7Recovery PumpRPx
Step 1.4 – Vacuum – open extraction column valve (1)
Component #Component NameAbbreviationOpen/OnClosed/Off
1Extraction Column ValveECVx
2Low Pressure Recovery ManifoldRM2x
3High Pressure Recovery ManifoldRM3x
4Purge PortPPx
5Recovery CylinderRCx
6Vacuum PumpVPx
7Recovery PumpRPx
Step 1.5 – Vacuum – Vacuum extractor to the maximum vacuum (~29″Hg)
Component #Component NameAbbreviationOpen/OnClosed/Off
1Extraction Column ValveECVx
2Low Pressure Recovery ManifoldRM2x
3High Pressure Recovery ManifoldRM3x
4Purge PortPPx
5Recovery CylinderRCx
6Vacuum PumpVPx
7Recovery PumpRPx
Step 1.6 – Vacuum – close extraction column valve (1) and low pressure recovery manifold (2)
Component #Component NameAbbreviationOpen/OnClosed/Off
1Extraction Column ValveECVx
2Low Pressure Recovery ManifoldRM2x
3High Pressure Recovery ManifoldRM3x
4Purge PortPPx
5Recovery CylinderRCx
6Vacuum PumpVPx
7Recovery PumpRPx
Step 1.7 – Vacuum – Wait 10 minutes and observe all pressure gauges for pressure drop, then check one valve at a time for pressure drop
Component #Component NameAbbreviationOpen/OnClosed/Off
1Extraction Column ValveECVx
2Low Pressure Recovery ManifoldRM2x
3High Pressure Recovery ManifoldRM3x
4Purge PortPPx
5Recovery CylinderRCx
6Vacuum PumpVPx
7Recovery PumpRPx


As always, if you have any questions please post them in the comments section. Your questions and time are valuable and we will make every attempt to help you through your process.

It is essential to understand the pathways of the different braided stainless steel lines lead to in order to understand the flow of the butane.

The best suggestion to learn this, is to visualize it. If you can picture it in your head, you can perform it on the extractor. By the time you’re done with this series of posts, you should be able to safely operate an extractor in both your mind as well as in reality.

As will be explained in a later post, the high pressure side recovery manifold valve (3) is closed just far enough to keep ~100PSI. By keeping 100PSI, the gas phase butane is liquified because the pressure. That liquid butane can be cycled back through (D) into the extractor or it can pass through (C) and (B) back into the recovery cylinder.

Final image - plumbing diagram

Stainless Steel hoses
A6 to 4 – vacuum pump to purge port
B5 to 4 – recovery cylinder to purge port
C4 to 2/3 – purge port to recovery manifold
D2 to 1 – low pressure side recovery manifold to extraction column valve
E10 to 7 – extraction collection chamber to recovery pump
F7 to 3 – recovery pump to high pressure side recovery manifold


As always, if you have any questions please post them in the comments section. Your questions and time are valuable and we will make every attempt to help you through your process.

Setting up your recovery pump is a simple process on most extractors. You will likely have a 3/8” recovery hose connected to the lid of your collection chamber, where the gaseous butane is pulled through to the recovery pump (low pressure side) and pumps out to the high pressure side to be dumped into the recovery cylinder. 

A real world example by an awesome company.

There is a very good example of this setup on the market by Precision Extractors. If you pull up their website and take a look at the back of the extractor, you’ll see there is a column that is plumbed and placed behind the secondary recovery cylinder (on the right). That column is filled with 3A molecular sieves and is plumbed to the primary filling cylinder (on the left).

Their system works by pumping butane from the primary filling cylinder into the primary extraction column. After passing through the primary extraction column, it passes into the dewaxing column. The butane is evaporated off by heating the collection chamber and the negative pressure from the pump, pumping the butane into the recovery chamber.

From there, the butane passes through the pump in the gas phase to the 3A molecular sieve column. The butane gas passes out of the 3A molecular sieve column and is pumped into the primary filling cylinder where it condenses into the liquid phase due to the cold temperatures and higher pressure.

Although Precision Extractors have this set up natively on the PX1, there’s no reason a similar system can’t work with your current extractor. The explanation follows below.

Setting up your current extractor for in-line dehydration.

This is a simple system. It really just requires an additional column with end plates, an inline filter, and one additional stainless steel braided hose. Read up on the post about dehydrating your butane. On average, 1000g or 1Kg or 3A molecular sieves will be have enough capacity to dry all the butane you could use in a week. Use an appropriately sized column and pack it with the sieves. Connect a filter plate and a filter at the bottom of the column, and you’re nearly there.

Connect your 3A molecular sieve column (8) between the collection chamber (10) and the low pressure side of the recovery pump (7). While you may say that in-line filter driers can do the job, they’re not really up to the task when you do the desiccant math. This is a step that is better done with more desiccant than less. This is a simple improvement on what most people already do. You can certainly use an inline filter drier, but this ensures an efficacious dehydration.

Dehydration is an ongoing process.

While putting a column of molecular sieves inline is an improvement, it is only part of the process. It is very important that the molecular sieves are dried out after a day’s extractions. The nice part of this setup is that you can easily remove the molecular sieves from the column. That’s important because you need to dehydrate your sieves after you use them so  they’re ready to dehydrate your butane – the beauty of molecular sieves is that they are re-useable.

Once you’ve removed your sieves, pour them out into a pyrex dish. You can then put them into your vacuum chamber, apply heat and vacuum, and have fully recharged/dehydrated desiccant ready for use in the morning. This is a standard process in the pharmaceutical industry where drug substances must be kept free of humidity while in storage, and the molecular sieves are periodically recharged.

Conclusion.

For the price, you can’t miss the beat on dehydrating your butane. Not only does the dehydration improve your yields, it also helps save the seals of your pump that do not react well with water. Given those two improvements, the small investment of molecular sieves in-line from your extraction chamber to the low pressure side of your pump will pay itself back quickly.


As always, if you have any questions please post them in the comments section. Your questions and time are valuable and we will make every attempt to help you through your process.

Four temperatures parameters.

Terpenes are a valuable product captured the extraction process. Not controlling temperatures through the extraction will cause you to lose terpenes. There are four temperature parameters that need to be controlled in live resin extractions – fresh plant materials, butane, column, and purging temperatures.

Freezing live plant materials under inert conditions.

Live resin requires low temperatures to extract cannabinoids and terpenes and leave behind water and plant waxes. Since dry ice and ethanol are required for almost every step, it makes sense to use it for flash freezing the plant material. This is done by filling vacuum bags with fresh plant material in a way that maximizes surface area. Once filled with plant material, the bags are filled with dried CO2 gas to purge out the humidity from the room. The bags are vacuum sealed, dipped into a dry ice bath until fully frozen, and are then made ready to fill into a prechilled column.

There are many ways to freeze plant material. Choose the one that works best for you. 

Cooling your butane with a condensing coil.

Control your butane temperature before it comes in contact with the plant material. If you don’t, your freshly frozen plant materials will thaw from the warm butane, and start to release plant lipids. Pass your butane through a condensing coil that is submerged in a dry ice/ethanol bath – on average, the dry ice bath will cool the butane down anywhere from -20C to -50C. The cooling capacity, or rate of cooling, is dependent on the size of the bath and the amount of dry ice added to it. Once cooled down, the liquid butane passes into your packed column and the extraction begins.

Temperature control at the column is key to long soak times.

A commonly missed point is that the column must be frozen in the freezer prior to extraction. Do this, and you’re one step ahead of the game.

A problem with long soak times is that the frozen plant material can be warmed up if the column temperature is not controlled. This causes the water that’s locked up in the solid phase (i.e. ice) from plant cells to release water, water-soluble phytochemicals, and plant lipids/waxes. 

After the cooling coil, butane temperature needs to be controlled at the column. Keeping the column at a temperature less than -20C (optimally -30C to -40C) ensures water and waxes do not contaminate the extract. The column temperature can be controlled by a dry ice/ethanol bath; it can be connected to a cryogenic pump or just be an open sleeve/cylinder filled dry ice and ethanol. If dry ice isn’t available, an ice bath will improve your extractions.

Transferring to thin film and purging.

You’ve finally got your live resin extract in the collection chamber of your extractor. Live resin extracts are low viscosity – the additional terpenes decrease the internal friction of the liquid. Pour the extract onto silicon mats, then scrape out the collection chamber with a silicon spatula and transfer it onto a second mat. You’re now ready to purge.

Live resin purging – temperature and time.

Two important components in any chemical reaction are temperature and time. Higher temperatures cause loss of terpenes, but decrease the purging times to boil off all the butane. Keep your purging conditions below room temperature and not much below 5C. This preserves terpenes, but is still above the boiling point of butane. To make up for the lower temperature, increase the amount of time spent purging to 5 days. This is the simplest process to preserve your terpenes, and make your live resin runs worth while.

General purging tips.

A favored way of purging is to heat the extract up to it’s purging temperature for 30 minutes without pulling a vacuum. Once the oil is up to your desired purging temperature, you can pull a full vacuum. Purging times vary from strain to strain, but you can follow the bubbles to see when your extract is purged. The purging has nearly completed when the major bubbles of butane stop forming – those bubbles are typically large and burst when they reach their maximum size. You’re looking for the point when the bubbling slows down and only small bubbles form. At this point, you can dial in your process with residual solvent testing at your local laboratory to confirm when your extract is fully purged.

Conclusion.

Properly controlling temperatures of fresh plant materials, butane, column, and purging will improve your process. There are multiple benefits at each step, that when combined create perfect conditions for preserving the essence of the fresh plant – the terpenes. Not all starting materials are worthy of making live resin. When you do have good starting materials, you will be rewarded with knockout flavor and taste that would have otherwise been lost to the atmosphere. Follow these steps and enjoy the experience.


As always, if you have any questions please post them in the comments section. Your questions and time are valuable and we will make every attempt to help you through your process.

Minimum standards for making live resin hash oil extracts

So what is a bare bones method to making live resin? Well, just about any extractor can be made to meet the minimum standards of a terpene rich extract. Whether you’re trying to go with fresh frozen material, or material that is just about ready to start curing, you can do your best to preserve terpenes and minimize the amount of plant waxes that are extracted. I’ll keep this post short, since most of this information is covered in other posts.

Step 1: dehydrate your butane.

This is a simple step that few extraction artists I’ve spoken to take advantage of. If there’s one thing that helps the extraction process, it’s this. If you don’t dehydrate your butane, you increase the chances of there being blockages in the column or even your braided stainless steel hoses caused by freezing water. In addition, it improves the extraction efficiency because water will change up the solubility properties of the butane.

Hands down, putting 3A molecular sieves in-line on the low pressure side of your recovery pump will improve your extraction efficiency. It’s not hard to do, and it will improve your process and end product.

Step 2: freeze your plant materials.

Whether you’ve chosen to run fresh frozen, dry your buds to the point before curing, or cure your buds, you’re going to benefit from freezing them before extracting. This equilibrates the temperature of the buds to the temperature of the butane, and reduces the amount of plant waxes pulled during an extraction. In step 3, you’re going to freeze your butane. Now imagine this mass of buds packed into your column, and both the buds and the column are at room temperature. Now imagine that -50C butane rifling into the column and hitting buds and stainless steel that are at a warm 20C…

You can surely see where this is going – the butane will be warmed up and the buds will be cooled down. When that happens, you’re defeating the purpose of chilling your butane in the first place – you’re now extracting the very plant waxes that you were trying to avoid extracting in the first place! The point is, try to make everything as cold as possible to get the best results. Terpene rich extracts are higher quality and have more medicinal potential – don’t skimp out on this simple step that anyone can accomplish.

Step 3: freeze your butane.

This is perhaps the simplest step to take to improve your extractions. If you’re going to take any steps towards making live resin, freeze your plant materials, column, and butane. You don’t necessarily have to dehydrate your butane, but if you take steps 2 and 3 into account, you’ll certainly improve your product.

While you may not have dry ice on hand, you do likely have ice on hand just for the sake of recovering your butane. Take the time to submerge your recovery cylinder in an ice bath. That ice bath can be dry ice with denatured alcohol, or it can just be ice, salt, and water. Either way, this step will reduce the amount of waxes that are butane soluble by reducing temperature.

Step 4: cold purge.

While you may not have the capacity to purge your extract with an inert gas (e.g. dried CO2 gas), you do have the ability to extract at room temperature and pull a full vacuum, assuming you have a vacuum chamber. The boiling point of butane is -0.5C at standard atmospheric pressure (1 bar/1 atm/14.5 PSI). When you pull a vacuum, you reduce the boiling point, and a major factor becomes time. Give an extract enough time at room temperature while under vacuum, and you’ll be able to pull off all the butane while preserving terpenes.

While it’ll be different for every situation (elevation, room temperature, quality of vacuum), 5 days at room temperature with a full vacuum will purge out your butane and leave you with a terpene rich extract. For smokable forms, I always suggest having a residual solvents test run by your local testing facility to make sure that you’re below the threshold for butane.

Conclusion.

These four steps will take you well on your way to higher quality extracts that preserve terpenes. If you can start working in this direction you’ll be using the trade secrets that some of the best extraction artists use day in and day out. Best of luck and enjoy those terpenes!


As always, if you have any questions please post them in the comments section. Your questions and time are valuable and we will make every attempt to help you through your process.